Knowing how to apply tile adhesive step by step is essential for strong and long-lasting tile installation. Whether you are fixing bathroom tiles, kitchen tiles, or floor tiles, the correct method ensures better bonding strength and durability.
Many tile failures happen because installers skip proper preparation or apply adhesive incorrectly. Therefore, understanding how to apply tile adhesive step by step helps avoid hollow tiles, cracks, and water seepage problems.
Step 1: Prepare the Surface
The first step in how to apply tile adhesive step by step is surface preparation.
- Ensure the surface is clean and dust-free
- Remove oil, grease, or loose particles
- Check that the surface is level
- Lightly wet the surface (if required)
A clean and solid base improves bonding performance.
Step 2: Choose the Right Tile Adhesive
Before learning how to apply tile adhesive step by step, select the correct adhesive type:
- Standard adhesive for ceramic tiles
- Polymer modified adhesive for bathrooms
- Heavy-duty adhesive for vitrified tiles
- Exterior grade adhesive for outdoor areas
Using the correct product ensures maximum bonding strength.
Step 3: Mix Tile Adhesive Properly
Proper mixing is critical in how to apply tile adhesive step by step.
- Add clean water to a bucket
- Slowly add tile adhesive powder
- Mix using a mechanical mixer or hand tool
- Ensure a smooth, lump-free paste
- Let it rest for 5 minutes
- Remix before use
Do not add extra cement or sand. Tile adhesive already contains the correct cement and polymer ratio.
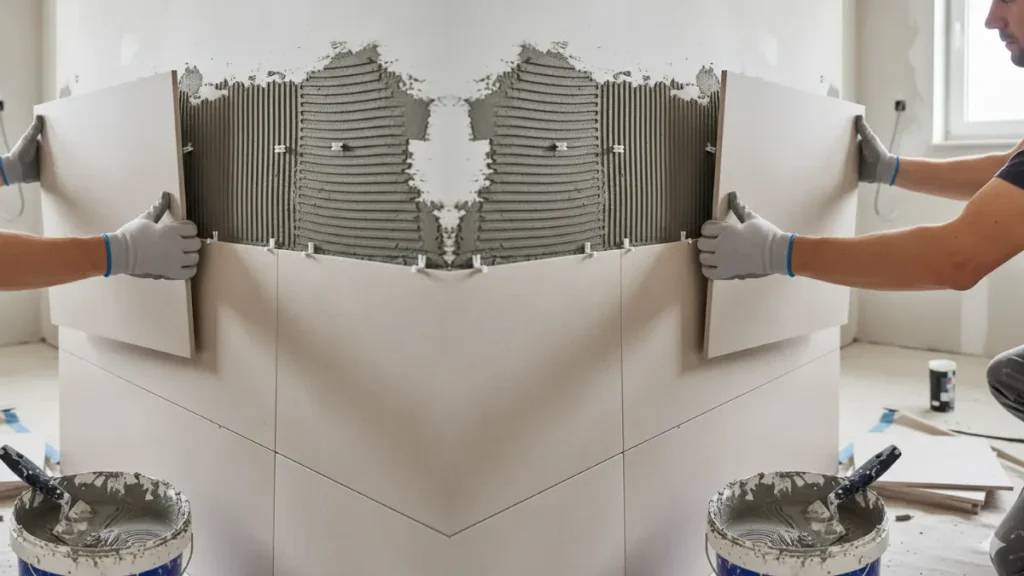
Step 4: Apply Adhesive with Notched Trowel
The most important part of how to apply tile adhesive step by step is spreading it correctly.
- Use a notched trowel
- Apply adhesive evenly on the surface
- Hold the trowel at 45° angle
- Create straight ridges
The ridges help remove air gaps and improve bonding strength.
Step 5: Fix the Tiles
After applying adhesive:
- Place the tile firmly
- Press and twist slightly
- Maintain proper tile spacing
- Use tile spacers for uniform joints
Following this method ensures better alignment and reduces hollow sound problems.
Step 6: Check Level and Alignment
While following how to apply tile adhesive step by step, continuously check:
- Tile level
- Proper alignment
- Even surface finish
Make adjustments before the adhesive sets.
Step 7: Allow Proper Curing
Let the adhesive cure for 24 hours before grouting. Avoid walking on freshly fixed floor tiles.
Proper curing improves durability and bonding strength.
Best Tile Adhesive for Bathroom Walls – Complete Buying Guide
Common Mistakes to Avoid
When learning how to apply tile adhesive step by step, avoid these errors:
- Mixing too much water
- Applying very thick adhesive layer
- Not using a notched trowel
- Adding cement to tile adhesive
- Skipping surface cleaning
These mistakes can reduce tile life and cause installation failure.
Final Thoughts
Understanding how to apply tile adhesive step by step ensures professional results, stronger bonding, and long-lasting tile installation. Compared to traditional cement mortar, tile adhesive offers better grip, flexibility, and water resistance.
Always follow manufacturer guidelines and use quality tile adhesive for best performance.


0 Comment